

How To Delete And Reinstall Windows 7
Factory Settings or Manufactory Defaults unremarkably refers to performing a restore or a reset of your reckoner to its original configuration as information technology commencement was when information technology was purchased.
A restore to factory settings is also known as a reset to factory settings or every bit a restore to factory defaults.
Restoring a computer to its factory settings will delete all personal files: music, movies, pictures and any installed software applications or drivers that were not included in the original configuration of that estimator.
Contents
- i Restore Windows XP to factory settings
- ane.1 Restore with installation CD
- 1.2 Restore without installation CD
- 1.3 Other options for restore
- 2 Restore Windows Vista to factory settings
- ii.1 Restore with installation CD/DVD
- ii.ii Restore without installation CD/DVD
- two.3 Other options for restore
- 3 Restore Windows vii to manufacturing plant settings
- 3.1 Restore with installation CD/DVD
- 3.two Restore without installation CD/DVD
- 3.3 Other options for restore
- iv Restore Windows 8, viii.1 to manufacturing plant settings
- iv.one Refresh Windows 8
- 4.two Reset Windows 8
- 4.three Restore with Organisation Restore
- 5 Restore Windows 10 to mill settings
- 5.one Refresh Windows x
- 5.two Reset Windows 10
- 5.3 Restore with System Restore
- vi More Information
- 6.ane Support Links
- 6.two Applicable Systems
Your computer can be restored to its factory settings if any of the following are applicable to you:
- You take a recovery partition installed on your computer. This partition is usually installed by the PC manufacturer (examples: Dell or HP) and can be used to restore a figurer.
- You accept a fix of recovery discs for your computer. These discs usually come with your estimator purchase and can be used to perform a restore.
- You accept the original Windows installation disc. This is the original disc that has Windows XP, Vista, 7, 8 or 10. Yous can use this media to reinstall Windows.
If none of the above are applicable to you, you still have these options to restore or repair your computer:
- Use Arrangement Restore. Windows XP-8 systems accept the System Restore feature enabled by default which can be used to restore a PC to an earlier time. If System Restore wasn't enabled, y'all won't be able to use to restore the PC.
- Apply Easy Recovery Essentials. Depending on the error your calculator is showing, use the Automated Repair feature to automatically fix boot errors or its Organisation Restore feature to restore your computer plus other useful features: access and fill-in your files, web browser, antivirus scanner etc.
Restore Windows XP to factory settings
If no tools are available from the PC manufacturer, east.g. recovery disc or recovery partition, employ the following tools from Windows XP itself to reset a estimator to its factory settings:
- The System Restore software (read instructions if you tin kicking into the organisation or instructions if yous don't have a Windows XP CD)
- The installation CD to perform a Repair Install or a reinstall of the organization
- Easy Recovery Essentials
Restore with installation CD
If System Restore isn't available for your Windows XP (turned off), use the original installation disc to perform a repair or reinstall Windows XP once more.
To perform a Repair Install, follow these steps:
- Insert the original disc in the disc tray
- Start the computer
- Press whatever fundamental when the computers shows the "Press whatsoever key to kick from CD" message
- Wait for the Windows XP CD to load
- At the Welcome to Setup screen, press Enter to access Repair Install.
Do not press R. You don't need access to Recovery Console, simply the Repair Install.
- Yous must agree to the End-Use License Agreement. Press F8 to hold.
- At the next screen, make sure that you accept the drive where Windows XP is installed highlighted. This is usually presented every bit:
C:\Windows "Microsoft Windows XP Professional person"
- Confirm that Setup presents you lot with these two choices:
To repair the selected Windows XP installation, press R.
and
To continue installing a fresh copy of Windows XP without repairing, press ESC.
If you don't have the "press R" option, you lot tin't perform a Repair Install.
- In one case highlighted, printing R
- Wait for the process to perform Repair Install
- Windows XP Setup will begin to install the operating organization again
- Continue with the steps of the wizard to setup the organization over again
For more information near Organisation Restore on Windows XP systems, read the Windows Arrangement Restore: Windows XP guide.
If yous tin't employ the installation CD, yous tin utilise Easy Recovery Essentials:
- Download Easy Recovery Essentials
- Fire the ISO paradigm. Follow these instructions on how to burn the bootable ISO image very carefully, as making a bootable CD tin can be catchy! Alternatively, these instructions explain how to create a bootable EasyRE recovery USB stick/drive.
- Kicking Piece of cake Recovery Essentials
- Select Windows XP from the list and click System Restore

- Choose a restore indicate

- Piece of cake Recovery Essentials will now create a backup of your current system configuration and brainstorm restoring the selected snapshot

- Once the process is complete, click Restart
- Done! Your Windows XP should now beginning once again.
Restore without installation CD
If yous don't have the original Windows XP installation CD, y'all may exist able to use System Restore in Safe Mode if this feature was enabled from the start.
To admission Safe Mode, follow these steps:
- Turn on the estimator
- Press and concur the F8 key right after booting
- At the Windows Advanced Options screen, choose Safe way with a Command prompt
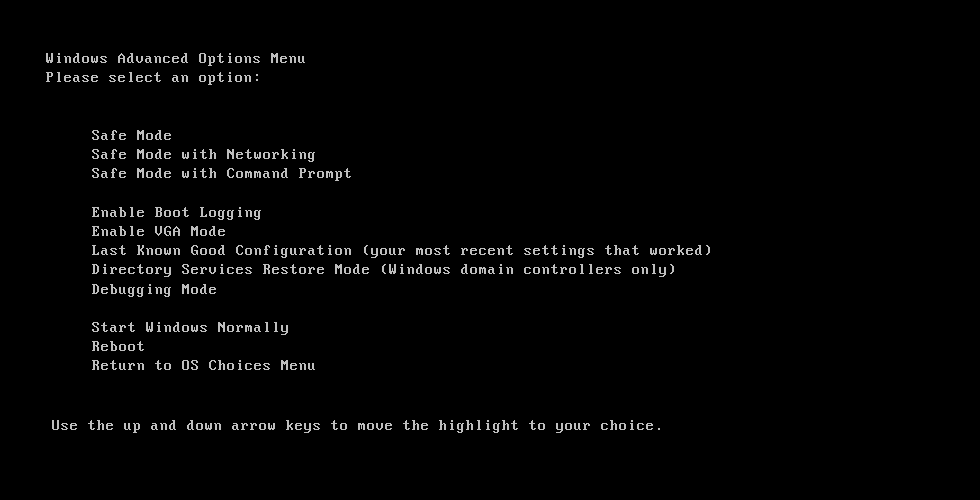
- In one case the option is highlighted, press Enter
- Login as Ambassador or as any user with administrative rights to your PC
- When Command Prompt appears, blazon this command and hit Enter:
%systemroot%\system32\restore\rstrui.exe
- Follow the next of instructions to continue with System Restore.
If you can't boot into Safe Mode, access System Restore from Easy Recovery Essentials:
- Download Easy Recovery Essentials
- Burn the ISO image. Follow these instructions on how to burn the bootable ISO image very carefully, as making a bootable CD can be tricky! Alternatively, these instructions explain how to create a bootable EasyRE recovery USB stick/drive.
- Boot Easy Recovery Essentials
- Select Windows XP from the list and click Organisation Restore
- Choose a restore point
- Piece of cake Recovery Essentials volition at present create a backup of your current system configuration and brainstorm restoring the selected snapshot
- Once the procedure is complete, click Restart
- Done! Your Windows XP should now start once more.
Other options for restore
Method #one: Reinstall Windows XP
If Fix #1 (Repair Install) explained above doesn't fix the computer, y'all can also reinstall the organisation to take a difficult reset of your system.
Reinstalling Windows XP volition delete all personal files. Use Easy Recovery Essentials to backup your files earlier you proceed.
To exercise so, follow these steps:
- Insert the Windows XP CD in the tray
- Turn on the system
- Press whatever primal to boot from the CD, when at the "Press any fundamental to boot from CD" screen
- Expect for the CD to load the necessary library of files
- At the Welcome to Setup screen, press Enter to begin the installation
- Agree to the End-Use License Agreement. Press F8 to exercise so.
- Select where to install Windows XP. Y'all tin can also use the D and C keys to delete and so create a new partition.
- Press Enter to install the system on the selected sectionalization (highlighted)
- Press Enter to go along
- Choose to format the sectionalization
- Look for the process to cease
- Remove the CD from the disc tray when Setup mentions that your calculator will restart
- Await for the system to boot into the Windows XP
- Follow the instructions of the wizard to setup the system once more
Method #2: Use Easy Recovery Essentials
Piece of cake Recovery Essentials (or EasyRE) can be used to repair or restore a Windows XP system:
- Find and set up errors automatically with Automated Repair
- Recover your PC from infections with the born antivirus
- Restore your PC to a working state
- Access and backup your well-nigh important information (like documents, pictures, music, videos and so on)
Download Easy Recovery Essentials
Restore Windows Vista to manufactory settings
To restore a Windows Vista to mill settings, you can employ:
- Arrangement Restore to restore the calculator to an earlier working session
- An install CD to run Arrangement Restore, a Startup Repair or a reinstall to restore the computer
- Easy Recovery Essentials
If the above aren't available for y'all, you can likewise kicking into Safety Mode and attempt to run System Restore and Startup Repair.
To perform a hard reset of the computer, y'all demand the installation disc to reinstall Windows Vista.
Restore with installation CD/DVD
If you still have the original Windows Vista CD/DVD and the CD has the Startup Repair feature installed, you lot can use it to either repair your computer or reinstall the system.
Fix #ane: Run Startup Repair
Startup Repair won't reset a estimator to its original factory settings, but it can attempt to set various errors.
To run Startup Repair follow these instructions:
- Boot the figurer
- Insert the Windows Vista CD
- Printing whatever primal at the "Press any cardinal to kick from CD or DVD" screen
- At the Install Windows window, select your language, fourth dimension and currency and keyboard method
- Click Next
- Click Repair Your Computer

- Select the operating organisation from the list
- Click Next
- Await for Startup Repair to search and gear up for any bug it finds
- At the Restart your calculator to complete the repairs screen, click End
Fix #ii: Utilize Like shooting fish in a barrel Recovery Essentials
Like shooting fish in a barrel Recovery Essentials can admission Organisation Restore snapshots created on a Windows Vista reckoner. To do and then, follow these steps:
- Download Like shooting fish in a barrel Recovery Essentials
- Fire the ISO image. Follow these instructions on how to burn down the bootable ISO epitome very carefully, as making a bootable CD can be tricky! Alternatively, these instructions explain how to create a bootable EasyRE recovery USB stick/drive.
- Kicking Easy Recovery Essentials
- Select Windows Vista from the list and click System Restore
- Choose a restore indicate
- Easy Recovery Essentials volition now create a backup of your current organization configuration and begin restoring the selected snapshot
- In one case the process is complete, click Restart
- Washed! Your Windows Vista should at present get-go again.
Restore without installation CD/DVD
Fix #1: Run Organisation Restore from Safe Style
System Restore may too be available via Rubber Mode without a need for the original Windows Vista installation CD.
System Restore will not work if information technology has been turned off!
To admission Organization Restore via Safety Mode, follow these steps:
- Start the PC
- Press and hold the F8 central earlier the Windows Vista logo appears on your monitor
- At the Advanced Kick Options, select Safe style with Command Prompt
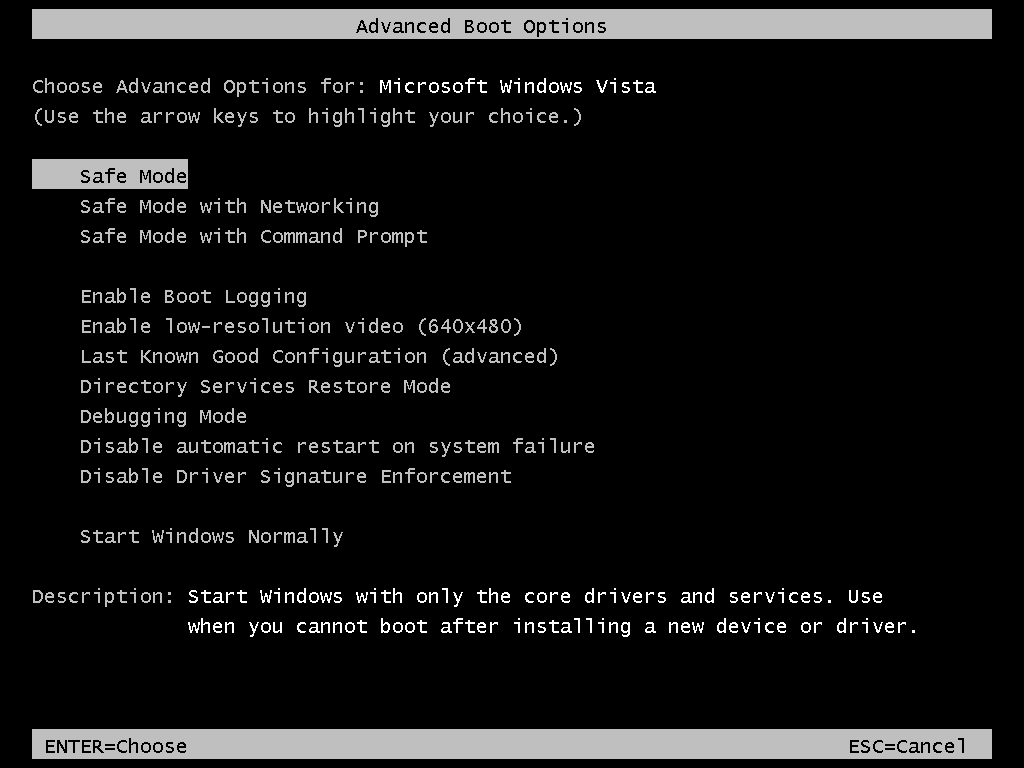
- Printing Enter
- When Control Prompt is available, type the post-obit command:
rstrui.exe
- Press Enter
- Enter the password for the Administrator and printing Enter, if prompted to do so
- Follow the wizard instructions to choose a restore signal
Gear up #2: Run Startup Repair from Safe Style
Startup Repair might also be installed on your hard disk. Startup Repair won't reset your computer to its factory settings, just it tin can endeavor to fix diverse errors.
To admission it, follow these instructions:
- Kick the computer
- Printing F8 and hold until your system boots into Windows Advanced Boot Options
- Select Repair Cour Reckoner
- Select a keyboard layout
- Click Next
- Login as an administrative user
- Click OK
- At the Organisation Recovery Options window, select Startup Repair

Set up #3: Use Easy Recovery Essentials
Easy Recovery Essentials tin can access the snapshots created by System Restore on a Windows Vista computer. Follow these steps:
- Download Easy Recovery Essentials
- Burn the ISO epitome. Follow these instructions on how to fire the bootable ISO epitome very carefully, as making a bootable CD can be tricky! Alternatively, these instructions explain how to create a bootable EasyRE recovery USB stick/drive.
- Boot Easy Recovery Essentials
- Select Windows Vista and click System Restore
- Choose a restore point
- Easy Recovery Essentials will now create a backup of your current arrangement configuration and begin restoring the selected snapshot
- One time the process is consummate, click Restart
- Washed! Your Windows Vista should now kickoff again.
Other options for restore
Method #1: Run System Restore from Windows Vista
Windows Vista systems can be restored to an earlier time if System Restore was enabled and was able to create snapshots correctly.
If you tin admission Arrangement Restore on your Windows Vista arrangement, follow these steps:
- Boot your figurer
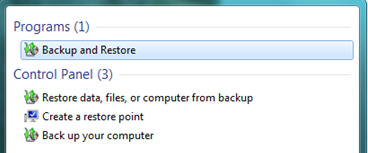
- Click Start
- Type
restorein the search bar - Select Backup and Restore Center from the search results list
- Select either to select a custom date for restore or a recommended date by Windows Vista
- Click Next
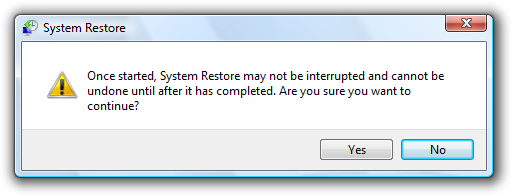
- Click Yeah, at the warning bulletin
- Wait for process to finish
- Your figurer may restart
- When your figurer boots dorsum, click Close when presented with the success message: System Restore completed successfully
For more data near System Restore on Windows Vista systems, read the Windows Organization Restore: Windows Vista guide.
Method #2: Reinstall Windows Vista
To reinstall Windows Vista and perform a hard reset of your computer, follow these steps:
Reinstalling Windows Vista volition delete all personal files. Employ Like shooting fish in a barrel Recovery Essentials to backup your files before you proceed.
- Insert the install CD
- Restart the computer
- Press whatsoever key to boot from the CD when prompted to exercise and then
- At the Install Windows window, select a linguistic communication, fourth dimension and keyboard method
- Click Next
- Click Install Now
- Follow the magician instructions to install Windows Vista on your computer
Method #iii: Use Easy Recovery Essentials
Piece of cake Recovery Essentials (or EasyRE) can be used to repair or restore a Windows Vista arrangement:
- Find and fix errors automatically with Automated Repair
- Recover your PC from infections with the built-in antivirus
- Restore your PC to a working state
- Admission and fill-in your most important information (similar documents, pictures, music, videos and so on)
Download Easy Recovery Essentials
Restore Windows 7 to factory settings
Windows 7 systems can be restored to manufacturing plant settings (or manufactory defaults) if you take the installation disc available to perform a reinstall or a consummate new installation of Windows 7.
If a disc isn't available, you can utilise System Restore or Startup Repair to either restore the computer to an earlier working time or to potentially repair errors.
You can also use Easy Recovery Essentials.
Restore with installation CD/DVD
If yous have the Windows 7 installation disc available, you can use it to perform a repair of your computer (and attempt to fix potential problems), a restore if Organization Restore is enabled, or to reinstall Windows 7.
Gear up #1: Run Startup Repair or System Restore from the disc
The steps are:
- Start the computer
- Printing and concord the F8 key
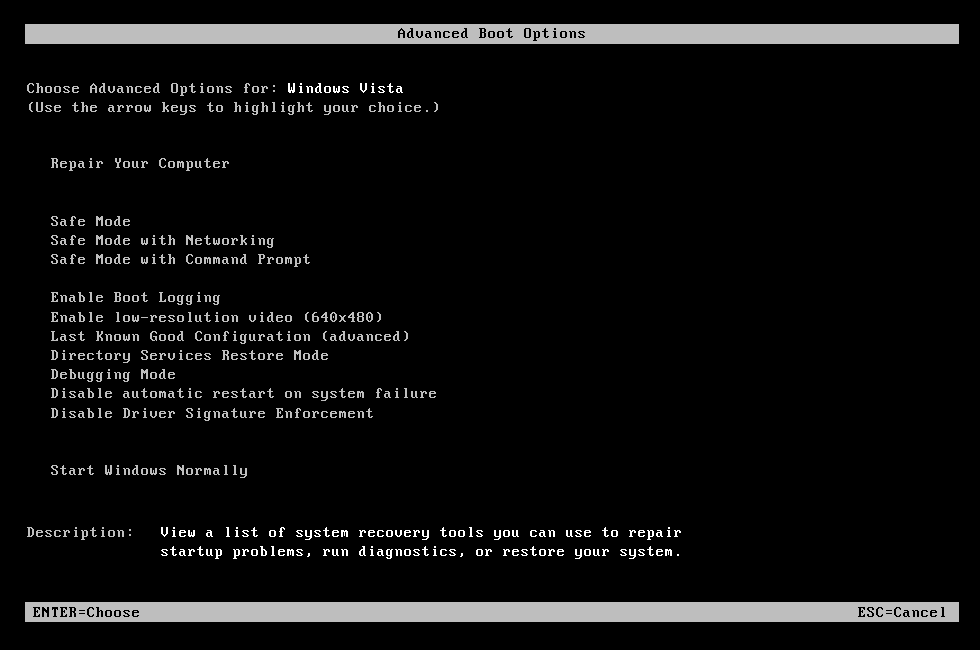
- At Avant-garde Boot Options, choose Repair Your Calculator

- Press Enter
- Select a keyboard linguistic communication and click Next
- If prompted, login with an administrative account
- At the System Recovery Options, choose System Restore or Startup Repair (if this is bachelor)
- Follow the sorcerer instructions to go on with any of the above
System Restore tin can restore your computer to an earlier date if it has been enabled and ran correctly, while Startup Repair tin attempt to fix any found errors that may foreclose you from starting Windows 7
Gear up #two: Employ Easy Recovery Essentials
Like shooting fish in a barrel Recovery Essentials can access System Restore snapshots:
- Download Easy Recovery Essentials
- Burn the ISO image. Follow these instructions on how to burn the bootable ISO image very advisedly, as making a bootable CD can be tricky! Alternatively, these instructions explain how to create a bootable EasyRE recovery USB stick/drive.
- Boot Like shooting fish in a barrel Recovery Essentials
- Select Windows vii and click System Restore
- Choose a restore point
- Easy Recovery Essentials will at present create a backup of your current system configuration and begin restoring the selected snapshot
- In one case the process is complete, click Restart
- Done! Your Windows 7 should now get-go again.
Restore without installation CD/DVD
If no install CD or DVD is available, you lot can boot into Safety Mode and run Organisation Restore.
Set up #one: Run Arrangement Restore from Rubber Manner
Before you brainstorm, note that you can't undo a restore if you run it from Safety Mode.
The instructions are:
- Turn on the computer
- Press and concord the F8 key
- At the Advanced Boot Options screen, choose Safe Manner with Command Prompt
- Press Enter
- Log in as Administrator
- When Command Prompt appears, blazon this command:
rstrui.exe
- Press Enter
- Follow the wizard instructions to continue with System Restore
Or, you can run Organization Restore via the System Recovery Options carte:
- Turn the computer and press the F8 key equally in a higher place
- When yous are at the Advanced Boot Options screen, cull Repair Your Reckoner
- Cull a keyboard layout
- Click Next
- At the System Recovery Options window, choose System Restore

- Follow the instructions to kickoff the restore process
Fix #ii: Run Startup Repair
Startup Repair can be included on your computer. You can run Startup Repair to perform a scan and fix potential issues.
Startup Repair doesn't restore a reckoner to its factory settings, just information technology tin potentially fix errors that foreclose you lot from booting into the organization.
The steps to access Startup Repair are:
- Start the computer
- Press the F8 key before the Windows 7 logo appears
- At Advanced Kicking Options, cull Repair Your Estimator
- Press Enter
- At the System Recovery Options window, choose Startup Repair
- Follow the instructions to start the repair process
Fix #3: Employ Like shooting fish in a barrel Recovery Essentials
Easy Recovery Essentials can admission the snapshots created past Windows 7 System Restore. Follow these steps to access your figurer's restore snapshots:
- Download Piece of cake Recovery Essentials
- Fire the ISO paradigm. Follow these instructions on how to burn the bootable ISO image very advisedly, as making a bootable CD tin can be tricky! Alternatively, these instructions explicate how to create a bootable EasyRE recovery USB stick/drive.
- Boot Easy Recovery Essentials
- Select Windows 7 and click System Restore
- Choose a restore point
- Easy Recovery Essentials will now create a backup of your current organisation configuration and begin restoring the selected snapshot
- Once the process is complete, click Restart
- Done! Your Windows 7 should now showtime once again.
Other options for restore
Method #1: Access System Restore from Windows 7
If yous can access and boot into your Windows 7 organization, you can use System Restore past post-obit these steps:
- Boot the computer
- Click Start
- Type
system restorein the search bar - Select Organisation Restore from the search result lists
- Type the countersign of an administrator, if prompted to do so
- Click Adjacent
- Select Choose a different restore bespeak
- Click Next
- Select a restore signal from the listing
- Click Next
- Click Stop
- Click Aye to confirm the process
- The process volition now beginning
- Your reckoner may reboot
- Click Close when the System Restore completed successfully message appears
For more information about System Restore on Windows vii system, read the Windows System Restore: Windows 7 guide.
Method #2: Install Windows seven again
To perform a hard reset of your computer, you tin can install Windows seven again on your computer.
This process erases everything on your calculator. Backup your files before you continue! Use the Scan/Backup Files feature from Piece of cake Recovery Essentials to backup your files. It works even if you can't kicking into Windows.
The steps to install Windows 7 are:
- Insert the CD or DVD in the disc tray
- Kick the figurer
- At the Install Windows screen, select a linguistic communication, time and keyboard
- Click Next
- Click Install At present

- Accept the license terms by clicking the "I accept the license terms" checkbox
- Click Adjacent
- Select Custom (avant-garde) at the "Which type of installation do you want?" question screen
- Follow the instructions to install Windows 7
Method #3: Utilise Easy Recovery Essentials
Easy Recovery Essentials (or EasyRE) can be used to repair or restore a Windows 7 system:
- Detect and fix errors automatically with Automated Repair
- Recover your PC from infections with the congenital-in antivirus
- Restore your PC to a working state
- Access and backup your most of import data (like documents, pictures, music, videos and then on)
Download Easy Recovery Essentials
Restore Windows 8, 8.ane to factory settings
Windows 8 can be restored to factory settings by either performing a "refresh" of your PC (without affecting your files) or by performing a "reset" (this removes personal files).
Other options include a system restore if Arrangement Restore wasn't turned off or using Easy Recovery Essentials.
Refresh Windows eight
Before y'all perform a "refresh" of your Windows 8, read the following notes:
- If your current version is eight.1, upgraded from 8.0, the refresh performance will restore Windows eight.0 back. Afterward the restore you need to upgrade to Windows 8.ane.
- Applications installed will be removed and a backup binder will be created for them. Applications that were originally installed with Windows 8 volition be reinstalled.
To refresh Windows viii, follow these steps:
- First Windows 8
- Go to Settings either by swiping in from the right edge of the screen or past pointing the mouse in the upper-correct corner of the screen
- Click Change PC Settings
- Click Update and recovery
- Click Recovery
- At the Refresh your PC without affecting your files, click Get started
- Follow the instructions on the screen
If you tin can't boot into Windows 8 to perform a Refresh, use the Automated Repair characteristic from Easy Recovery Essentials to fix any potential kick errors on your computer:
- Download Piece of cake Recovery Essentials
- Burn the ISO epitome. Follow these instructions on how to burn down the bootable ISO epitome very carefully, as making a bootable CD tin can be tricky! Alternatively, these instructions explain how to create a bootable EasyRE recovery USB stick/drive.
- Boot Easy Recovery Essentials
- Cull Automated Repair and click Continue
- Choose your Windows installation drive'southward letter (ordinarily C:\) and click Automatic Repair
- Piece of cake Recovery Essentials will now begin to fix errors automatically
- Once the process is complete, click Restart
- Done! Your Windows eight should now commencement again.

Reset Windows viii
A "reset" of Windows 8 removes all personal files from your computer.
Similar to a refresh of the system, if you upgraded from Windows 8 to Windows 8.1, the reset will restore Windows 8.0. You volition demand to upgrade to Windows 8.ane later.
The steps are:
- Start Windows 8
- Go to Settings either by swiping in from the right edge of the screen or by pointing the mouse in the upper-right corner of the screen
- Click Change PC Settings
- Click Update and recovery
- Click Recovery
- Under the Remove everything and reinstall Windows section, click Get started
- Follow the instructions on the screen
If you tin can't boot into Windows 8 to perform the Reset, utilize the Easy Recovery Essentials and run Automatic Repair to fix any potential kicking errors:
- Download Like shooting fish in a barrel Recovery Essentials
- Burn down the ISO image. Follow these instructions on how to burn the bootable ISO epitome very carefully, as making a bootable CD can be catchy! Alternatively, these instructions explain how to create a bootable EasyRE recovery USB stick/drive.
- Boot Easy Recovery Essentials
- Choose Automated Repair and click Go along
- Choose your Windows installation drive's letter of the alphabet (unremarkably C:\) and click Automatic Repair
- Easy Recovery Essentials will now begin to fix errors automatically
- Once the process is complete, click Restart
- Done! Your Windows 8 should now start over again.
Restore with Arrangement Restore
Organization Restore can restore your Windows eight or Windows viii.1 to a working condition. To admission whatever of System Restore's created snapshots, yous must load the utility by any of these methods:
- Admission it from inside Windows eight, if you can boot into Windows eight
- Access information technology using the original Windows viii installation DVD or Windows viii.1 installation USB
- Access the snapshots created by System Restore with Easy Recovery Essentials
Method #ane: Access Organisation Restore from within Windows 8/viii.1
- Open Windows 8
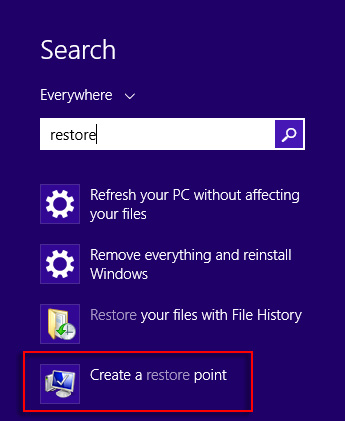
- Blazon
arrangement restorein the search bar - Select Create a restore point from the search results list
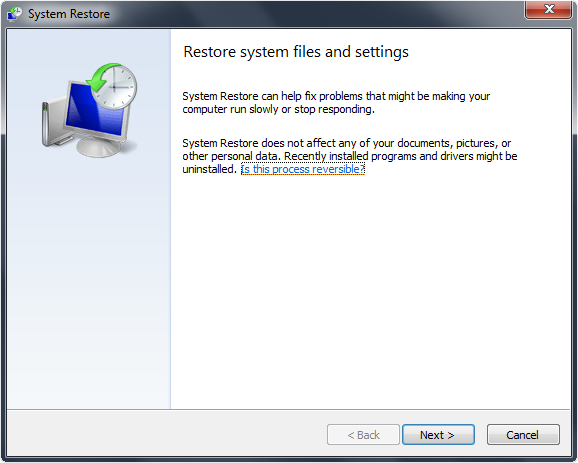
- Click System Restore from the Arrangement Protection tab
- Click Adjacent
- Select any of the restore points available
- Click Side by side
- Ostend the activity by clicking Yes

- Your figurer will restart
- Continue with the restore process instructions by logging back and going to Desktop. A success message should announced: System Restore completed successfully.
Method #two: Access Organization Restore at kicking using the installation media.
Windows Setup CD/DVD Required!
Some of the solutions below require the use of the Microsoft Windows setup CD or DVD. If your PC did non come with a Windows installation disc or if you no longer have your Windows setup media, you tin can use Easy Recovery Essentials for Windows instead. EasyRE will automatically find and prepare many issues, and can also exist used to solve this trouble with the directions beneath.
To access the snapshots, y'all need the installation media: original Windows eight DVD or original Windows 8.one USB drive. It'southward the media you used to install Windows.
The steps are:
- Insert the Windows 8/8.one installation media
- Restart the computer
- At the Install screen, click Repair your computer

- Click Troubleshoot
- At the Advanced Options screen, click Arrangement Restore
- Login as Ambassador
- Click Side by side
- Make sure that the Choose a different restore point selection is selected
- Click Next
- Select a restore signal
- Click Next
- Click Side by side again, at the Confirm your restore indicate screen
- Click Yeah at the alert message to confirm the procedure
- Look for the process to finish
- The PC may restart
- Login back and go to Desktop
- The success message should now appear: System Restore completed successfully.
Method #iii: Admission the snapshots with Easy Recovery Essentials
Easy Recovery Essentials can access the snapshots created by Arrangement Restore and restore your reckoner. To do and then, follow these steps:
- Download Easy Recovery Essentials
- Burn the ISO image. Follow these instructions on how to burn the bootable ISO prototype very carefully, as making a bootable CD tin can be tricky! Alternatively, these instructions explain how to create a bootable EasyRE recovery USB stick/drive.
- Boot Easy Recovery Essentials
- Select Windows eight and click System Restore
- Cull a restore point
- Easy Recovery Essentials volition now create a backup of your current system configuration and begin restoring the selected snapshot
- Once the procedure is consummate, click Restart
- Washed! Your Windows viii should now first once more.
Restore Windows 10 to factory settings
Windows x tin can be restored to factory settings past either performing a "refresh" of your PC (without affecting your files) or by performing a "reset" (this removes personal files).
Other options include a organisation restore if System Restore wasn't turned off or using Piece of cake Recovery Essentials.
Refresh Windows 10
To refresh Windows 10, follow these steps:
- Start Windows 10
- Open up theStart Card,type Recovery and printing Enter
- On the Recovery screen, click on the Get started button on the right side under Reset this PC
- If prompted to Insert Media, you will need to insert your Windows 10 installation mediato proceed
- Click on Keep my files
- If you have any apps that will be removed, then review the list, and click on Next when gear up
- Click on Reset to begin.
If you can't kicking into Windows 10 to perform a Refresh, use the Automated Repair feature from Easy Recovery Essentials to fix any potential boot errors on your computer:
- Download Piece of cake Recovery Essentials
- Burn the ISO image. Follow these instructions on how to burn the bootable ISO image very carefully, equally making a bootable CD tin be catchy! Alternatively, these instructions explain how to create a bootable EasyRE recovery USB stick/drive.
- Boot Easy Recovery Essentials
- Choose Automated Repair and click Proceed
- Choose your Windows installation drive's letter (commonly C:\) and click Automated Repair
- Easy Recovery Essentials will at present begin to fix errors automatically
- In one case the process is consummate, click Restart
- Done! Your Windows 10 should now start again.
Alternatively, yous may also endeavor to refresh your PC by booting into the Avant-garde Startuppick, clicking Troubleshoot -> Reset this PCand then post-obit the instructions on the screen.
Reset Windows x
A "reset" of Windows 10 removes all personal files from your computer.
The steps are:
- Showtime Windows 10
- Open theGet-go Menu,type Recovery and press Enter
- On the Recovery screen, click on the Become started button on the right side under Reset this PC
- If prompted to Insert Media, you will need to insert your Windows 10 installation mediato continue
- Click onRemove everything
- If your PC has more than one drive (partition) on the Windows 10 deejay, and then select to remove all files (delete) from only the Windows drive or from all drives. (see screenshots below)
- Click on either Just remove my files or Fully clean the bulldoze for how you want to clean your drive.
- Click on Reset to begin.
If you can't boot into Windows x to perform the Reset, utilize the Like shooting fish in a barrel Recovery Essentials and run Automated Repair to fix whatever potential boot errors:
- Download Like shooting fish in a barrel Recovery Essentials
- Fire the ISO paradigm. Follow these instructions on how to burn the bootable ISO image very advisedly, as making a bootable CD can be tricky! Alternatively, these instructions explain how to create a bootable EasyRE recovery USB stick/drive.
- Kicking Easy Recovery Essentials
- Choose Automated Repair and click Continue
- Choose your Windows installation bulldoze's letter of the alphabet (usually C:\) and click Automated Repair
- Easy Recovery Essentials will now begin to fix errors automatically
- Once the process is consummate, click Restart
- Done! Your Windows 8 should now first again.
Alternatively, y'all may besides endeavor to reset your PC by booting into the Avant-garde Startupoption, clicking Troubleshoot -> Reset this PCthen following the instructions on the screen.
Restore with Arrangement Restore
Organisation Restore can restore your Windows 10 to a working condition. To admission whatsoever of Organization Restore's created snapshots, you must load the utility by whatever of these methods:
- Access it from inside Windows ten, if yous can boot into Windows 10
- Access information technology using the original Windows 10 installation DVD or Windows x installation USB
- Access the snapshots created by System Restore with Easy Recovery Essentials
Method #one: Admission Arrangement Restore from within Windows ten
- Open Windows 10
- Open the Control Console
- Type
recoveryin the search bar and press Enter
- Click Open System Restore from the Recovery screen
- Click Adjacent
- Select whatever of the restore points bachelor
- Click Next
- Ostend the action by clicking Yep
- Your figurer will restart
- Continue with the restore process instructions by logging back and going to Desktop. A success bulletin should appear: Organisation Restore completed successfully.
Method #2: Access System Restore at boot using the installation media.
Windows Setup CD/DVD Required!
Some of the solutions below require the use of the Microsoft Windows setup CD or DVD. If your PC did not come with a Windows installation disc or if you lot no longer have your Windows setup media, you lot can utilise Easy Recovery Essentials for Windows instead. EasyRE will automatically find and fix many problems, and can also be used to solve this problem with the directions below.
To admission the snapshots, you need the original Windows 10 installation media. Information technology'south the media you used to install Windows.
The steps are:
- Insert the Windows 10 installation media
- Restart the calculator
- At the Install screen, click Repair your computer

- Click Troubleshoot
- At the Advanced Options screen, click System Restore
- Cull the Operating System you want to restore
- Click Side by side
- Cull the Restore Point yous want to use
- Click Next
- Click Next
- Click Yes at the warning bulletin to ostend the procedure
- Wait for the process to finish
- The PC may restart
- Login back and become to Desktop
- The success message should now announced: Organization Restore completed successfully.
Method #three: Access the snapshots with Easy Recovery Essentials
Easy Recovery Essentials can access the snapshots created by System Restore and restore your calculator. To do so, follow these steps:
- Download Easy Recovery Essentials
- Burn the ISO image. Follow these instructions on how to burn down the bootable ISO image very carefully, equally making a bootable CD can be catchy! Alternatively, these instructions explain how to create a bootable EasyRE recovery USB stick/bulldoze.
- Boot Like shooting fish in a barrel Recovery Essentials
- Select Windows 10 and click System Restore

- Choose a restore point

- Easy Recovery Essentials will now create a backup of your current system configuration and begin restoring the selected snapshot

- One time the process is complete, click Restart
- Done! Your Windows 10 should at present start again.
More Information
Support Links
- Easy Recovery Essentials for Windows – our repair and recovery disk.
It'southward an easy-to-use and automated diagnostics disk. It's bachelor for Windows eight, Windows vii and Windows Vista. It's also bachelor for Windows XP and Windows Server.
Read more at Windows Recovery Disks.
- The NeoSmart Support Forums, fellow member-to-member technical support and troubleshooting.
- Get a discounted price on replacement setup and installation discs: Windows XP, Windows Vista, Windows 7, Windows 8, Windows x.
Applicable Systems
This Windows-related knowledgebase article applies to the post-obit operating systems:
- Windows XP (all editions)
- Windows Vista (all editions)
- Windows 7 (all editions)
- Windows eight (all editions)
- Windows 8.1 (all editions)
- Windows 10 (all editions)
- Windows Server 2003 (all editions)
- Windows Server 2008 (all editions)
- Windows Server 2012 (all editions)
Suggest an edit
Source: https://neosmart.net/wiki/restore-to-factory-settings/
Posted by: myerslizeatied.blogspot.com
0 Response to "How To Delete And Reinstall Windows 7"
Post a Comment